Once you have connected and created your outputs, you will need to zone them. The Zones tab enables you to assign audio device outputs as well as displays to zones and further arrange in zone groups. The grouping is shown on the tab in a three structure.
There is no restriction to how many times each zone or zone group can be used in other zone groups, leaving the structure of zone grouping up to the user.
Since the individual device outputs are generated on the Audio devices tab, each output is created once, see the tutorial on nnounce - audio device configuration. Same as the display outputs are created on the Displays tab.
In this tutorial:
create zones from outputs,
create zone groups,
show how to configure:
access limitations and
icons to zones and zone groups.
configure assets and paging split.
assign zones and zone groups to UIs and user groups.
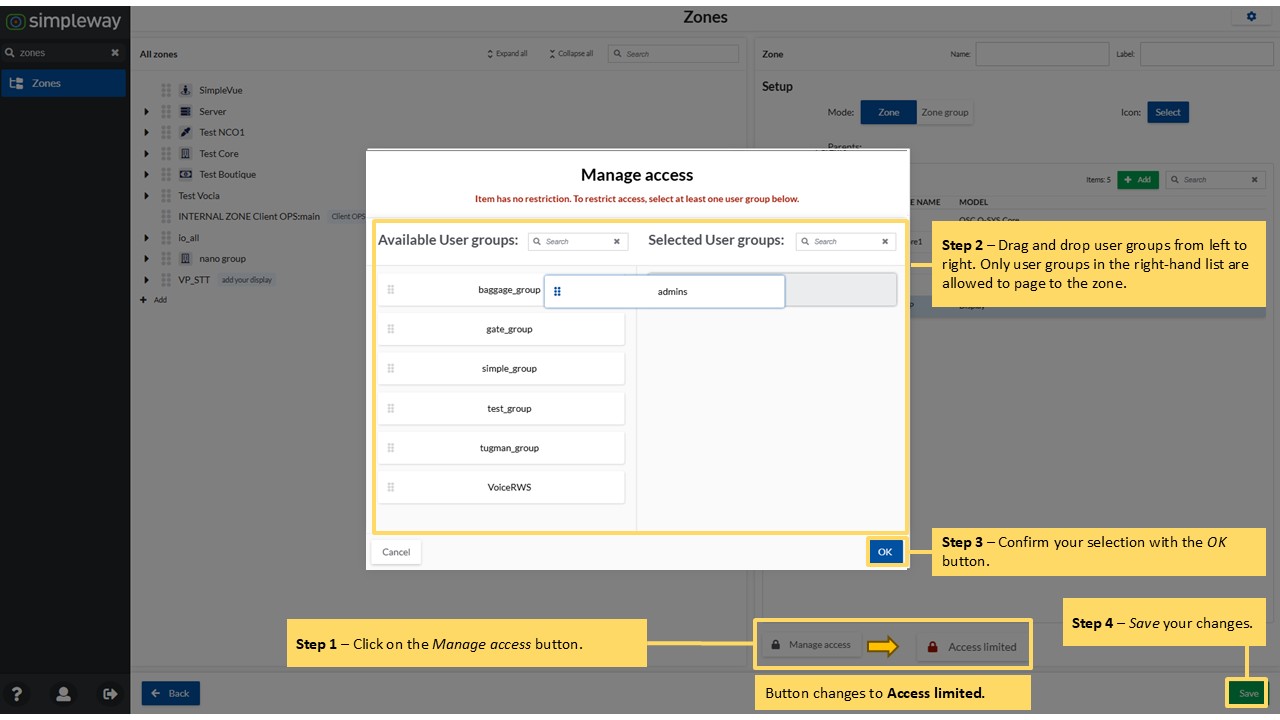
It is important to know that the zone and zone groups need to be assigned to user groups so the users are enabled to page into them. The here created zones and zone group hierarchies are then used on OpsUI paging tabs as Ad hoc announcement, Paging tab as well as in role-based UIs as FlexUI.
Topics covered:
Zones tab
UI configurations tab
Users tab
TUTORIAL STEPS:
A) Zones tab
Optional - Quick action button to add an output as a zone. Available outputs can be added as zones and later edited in the right-hand item detail. |
|
.JPG)
Zones creation
B) New zone
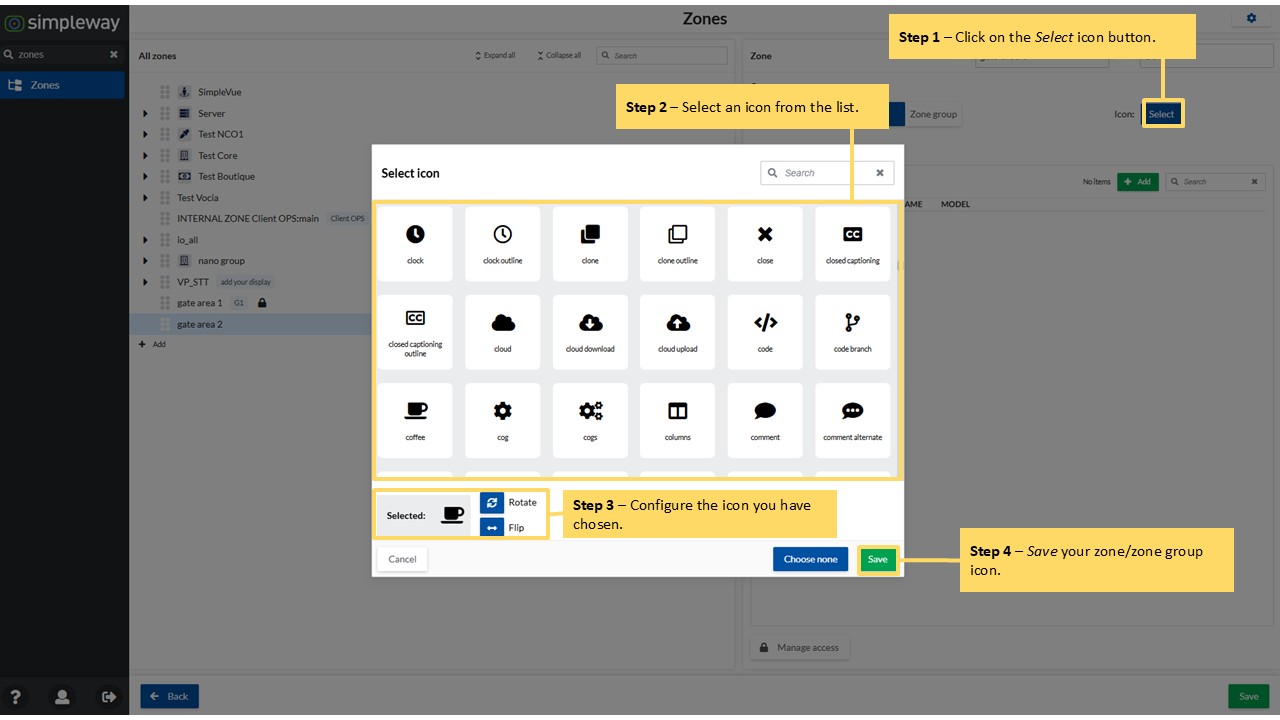
Optional – Add an icon for the zone. |
|
C) Add output/s to the zone Option 1 – The available outputs list opens. Choose individual outputs. Option 2 – Bulk add with checkbox and click on the Choose button. |
|
D) Save the new zone
Optional – Limit access to which user groups can page to this zone. |
|
.JPG)
.JPG)
.JPG)
Zones GROUP creation
E) New zone group
Optional – Add an icon and/or Manage access for the zone group, more information below. |
|
F) Add zone and zone groups The available zones and zone groups list opens. Choose individual items or bulk by clicking the item checkboxes. |
|
G) Add output/s to the zone group The available outputs list opens; outputs can be added to the zone group as a new zone. Choose individual outputs or bulk by clicking the item checkboxes. |
|
H) Save the new zone group
Optional – Switch on the Advanced feature to either hide the zone group's children or hide the zone group parent. By default, both are visible. |
|
.JPG)
.JPG)
.JPG)
.JPG)
Icons & Manage access features
ICONS for zone and zone groups The icon is visible on paging tabs and UIs in the zone selection field.
|
|
MANAGE ACCESS for zone and zone groups LImit access to the zone or zone group directly on the Zones tab.
|
|
Assets configuration & Paging split
A) Zone assets
|
|
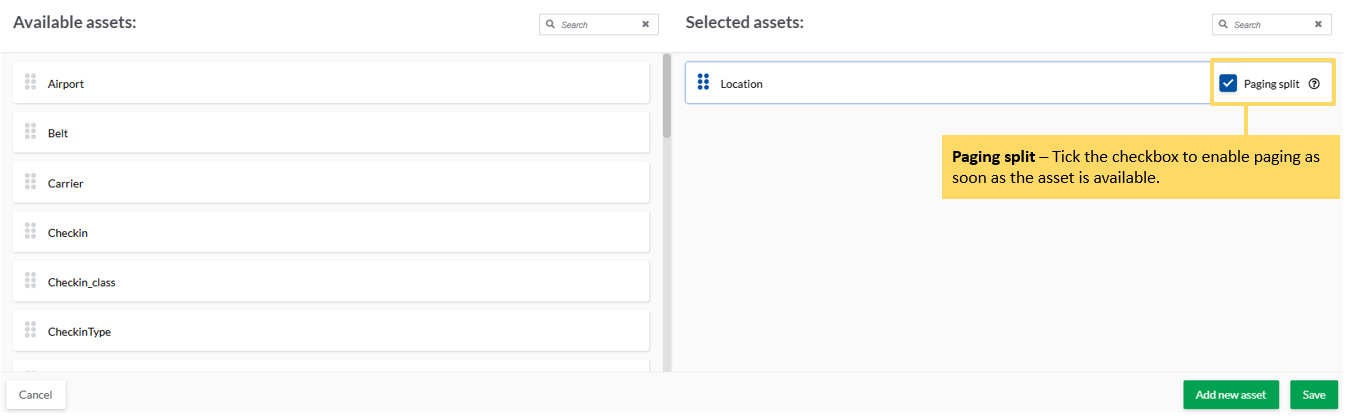
B) Paging split Tick the checkbox to enable paging as soon as the asset is available. |
Paging split breaks a single announcement into separate actions so each group of zones can play as soon as it's ready — without waiting for the others. This is useful when paging to locations that are far apart. For example, if you split by a custom field like "Location" (with values "Location 1" and "Location 2"), the announcement plays as two separate actions. "Location 1" plays as soon as its zones are free, without waiting for "Location 2." Splitting by an asset works the same way: the announcement plays as a separate action for each asset value, plus one more action for any zones with no asset value. |
C) Configure assets for your zones and zone groups
|
|
.JPG)
.jpg)
Assign zones and zone groups to UIs and user groups
Before your users can page into the created zones and zone groups, you will need to assign them.
A) Assign zones and zone groups to UI configurations
Now users with access to this user interface will be able to use these selected zones & zone groups for announcement playback. |
|
B) Users tab
|
|
C) Assign zones and zone groups to user
Now, this user will be able to use these selected zones & zone groups in addition to the ones already selected in OpsUI configuration for announcement playback. |
|
.JPG)
.JPG)
.JPG)