Start your nnounce cloud audio device configuration by connecting your ionode4 device to the network, how to do this is described in the ionode4 - Connect the device tutorial under "Hardware". You will then be able to link the ionode4 device with your Simpleway Cloud CX instance, which is described in this tutorial.
We will teach you how to set up both online and offline configurations and generate output zones.
Topics covered:
Audio devices tab
Zones tab
TUTORIAL STEPS:
A) Audio devices tab
Open the Audio devices tab.
Click the Add new device button.
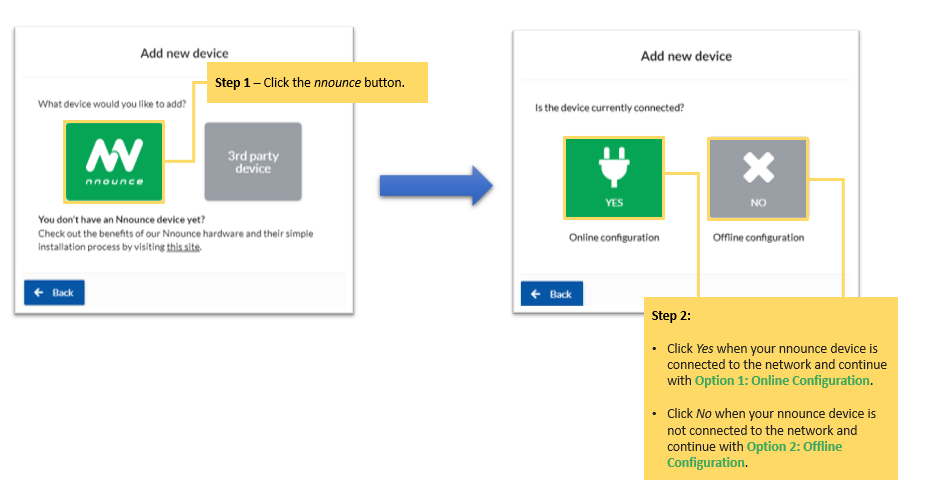
B) Add new device window
Click the nnounce button.
Click Yes when your nnounce device is connected to the network and continue with Option 1: Online Configuration. Click No when your nnounce device is not connected to the network and continue with Option 2: Offline Configuration.
Option 1: Online configuration C) The Config guide window opens with instructions for connecting the ionode4 device.
Confirm that your ionode4 device is logged in to the nnounce configuration UI.
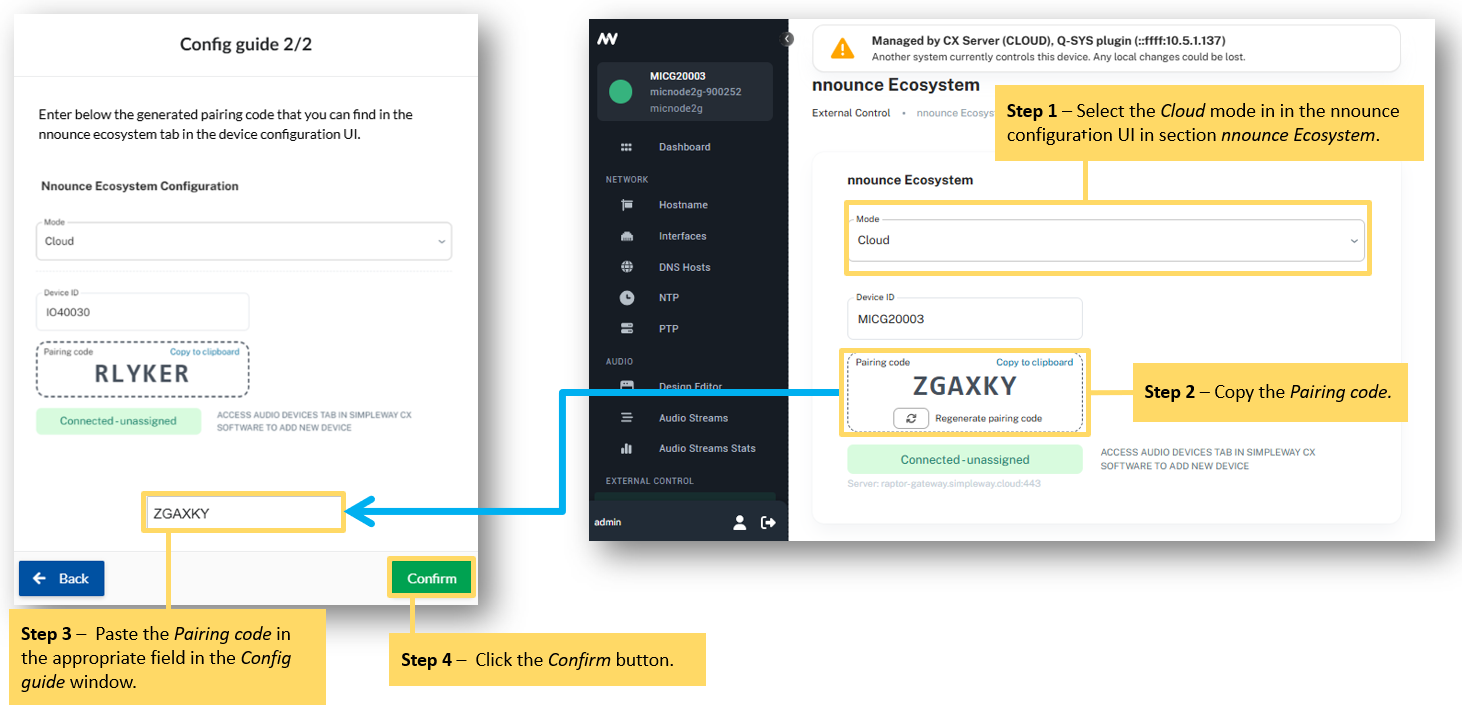
D) Configuration guide
Select the Cloud mode in in the nnounce configuration UI in section nnounce Ecosystem.
Copy the Pairing code.
Paste the Pairing code in the appropriate field in the Config guide window.
Click the Confirm button.
E)ionode4 device configuration
Rename your ionode4 device.
Wait until the connection of your device is set to green – connected. This may take a few moments.
Set up your device settings. You can also configure them directly in the nnounce configuration UI.
Note: Use the settings icon next to the field to access additional information.
F) Paging router INPUTS
Click the Add input button to set up the paging inputs.
Choose the paging inputs according to the configuration of your nnounce design.
Note: The paging inputs and outputs depend on the configured nnounce design.
G) Paging router inputs
Set the use of your chosen paging inputs.
H) Paging router OUTPUTS
Click the Add output button to set up the paging outputs. A new Available outputs on device window opens.
Choose the paging router outputs according to the configuration of your nnounce design.
Note: The paging inputs and outputs depend on the configured nnounce design.
I) Generate zones
Set the use of your paging outputs.
Click the Generate zones button. A new Generate zones window opens.
Tick the checkbox of the zone you want to add to the Zones tab.
Click the Generate zones button.
Save your settings.
Note: You may want to click the Generate all from design button if you want all new outputs from the design that are not already present on the audio device to be added, and zones to be created for all outputs.
Note: The Exists column in the Generate zones window indicates whether the zone is already available on the Zones tab to prevent the creation of duplicate zones. The red icon informs you that the zone does not yet exist. As soon as the zone is generated, the icon will turn green and the zone will be available in the Zones tab. No further action is required.
J) Audio devices tab main page
Your connected device is visible on the main page of the Audio devices tab.
K) Zones tab main page Your generated zone is visible on the Zones tab.
Option B: Offline configuration L) Add new device window
Select the ionode4 option from the Device type dropdown.
Confirm your selection.
M) ionode4 device configuration
Name your ionode4 device.
Save your settings.
N) Audio devices tab main page
Your offline configuration of the ionode4 device is visible on the main page of the Audio devices tab.
O) To complete your ionode4 configuration, re-open your offline configuration and click the Assign device button. Perform steps from C) to K).
.JPG)
.JPG)
.JPG)
.JPG)
.JPG)
.JPG)
.JPG)
.JPG)
.JPG)
.JPG)
.JPG)
.JPG)
.JPG)