QSC Core Installation
- 01 Feb 2023
- 3 Minutes to read
- Print
- Download PDF
QSC Core Installation
- Updated on 01 Feb 2023
- 3 Minutes to read
- Print
- Download PDF
Article summary
Did you find this summary helpful?
Thank you for your feedback!
Once your QSC Q-SYS cores are wired to the rest of your Public Address System and plugged in, it is time to connect them with the Simpleway CX system!
Topics covered:
- Q-SYS Core Manager setup, and Connection of the QSC Q-SYS core to the Simpleway CX system
TUTORIAL STEPS:
During the installation, there are two QSC interfaces you will work with:
- Q-SYS Core Manager - a website you can access through your browser
- Q-SYS Designer Software - a desktop application that needs to be installed and run on your computer
Before you start setting up the connection between the QSC Q-SYS core and the Simpleway CX system, download and install the Q-SYS Designer Software on your computer in case it has not been installed yet. You can find the latest software here: https://www.qsc.com/resources/software-and-firmware/q-sys-designer-software/
Note: To download the Q-SYS Designer Software, it is necessary to create an account on the QSC website.
How to set up the QSC core software part
Once the QSC Q-SYS core is plugged in, you should see its IP address on the display of the core. Write this IP address down and insert it into the address bar of your browser.
- The Q-SYS Core Manager website opens.
- Navigate to the Network tab and select Basic.
The following guide applies to QSC cores 110i and 110c.
| To configure the Internal part of the network (LAN A), please, coordinate with your IT department to obtain the appropriate settings. Note: You cannot use the same control network segment as provided by the Simpleway management bridge e.g: 192.168.252.0/24. | .png) |
| A) Setup basic Network In the Network tab, under Basic, please, follow these steps: In the LAN B/AUX section, representing the control network (connection to the management bridge): Step 1: Set the Mode to Static. Step 2: Set the IP address to the one provided by Simpleway after the Instance is started up (eg. 192.168.252.200). The particular IP address from the provided segment you choose is up to you, apart from the first ten (in this case, it would be: 192.168.252.0 - 192.168.252.9) and the last one from the segment (192.168.252.254). Step 3: Set the Net Mask to the one provided by Simpleway (eg. 255.255.255.0 - /24). Skip the Gateway field. Step 4: Save all the changes. Note: This process needs to be completed for each QSC Q-SYS core you intend to use with the Simpleway CX System. | .png) |
| B) After you completed the steps above: Step 1: Navigate to the Access Management tab | 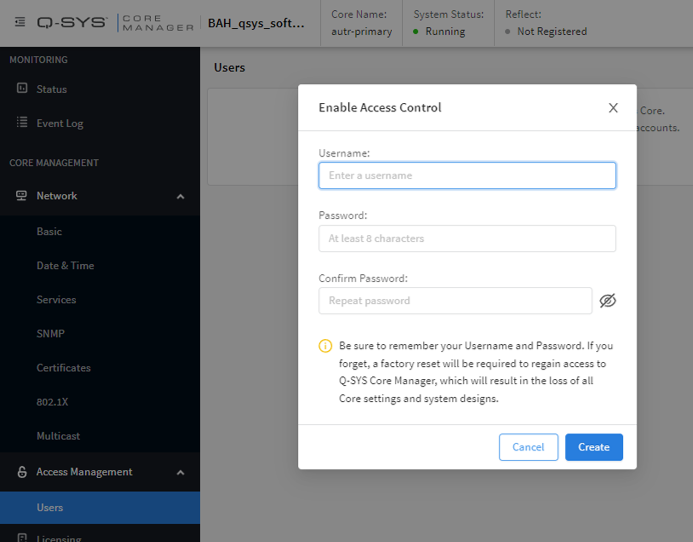 |
The following guide applies to the QSC Q-SYS Core 500 series.
| For the 500 series QSC Q-SYS cores, a dedicated AUX port is available. In this case, it is up to you which port you prefer. We would still recommend keeping LAN A/B for the audio transfer only and AUX for the control network. Step 1: Set the Mode to Static. Step 2: Set the IP address to the one provided by Simpleway after the Instance is started up (eg. 192.168.252.200). The particular IP address from the provided segment you choose is up to you, apart from the first ten (in this case, it would be: 192.168.252.0 - 192.168.252.9) and the last one from the segment (192.168.252.254). Step 3: Set the Net Mask to the one provided by Simpleway (eg. 255.255.255.0 - /24). Skip the Gateway field. Step 4: Save all the changes. Note: In case of redundancy, LAN A and LAN B need to have separate network segments and separate network switches or use VLAN separation (eg. 10.30.115.11 for LAN A and 10.30.116.11. for LAN B) | .png) |
Now, it is time to open the Q-SYS Designer Software and create a user there as well. This is how to do it:
| In the Q-SYS Designer: Step 1: Load your design and in the Tools menu, select the option Show Administrator… | .png) |
| Step 2: In the Administrator tab, select the option Users Step 3: Click the Plus icon to create a new user Step 4: Create a user with the same credentials as in the QSC Core Manager. Note: the user credentials created in QSC Core Manager and Q-SYS Designer must be identical. | 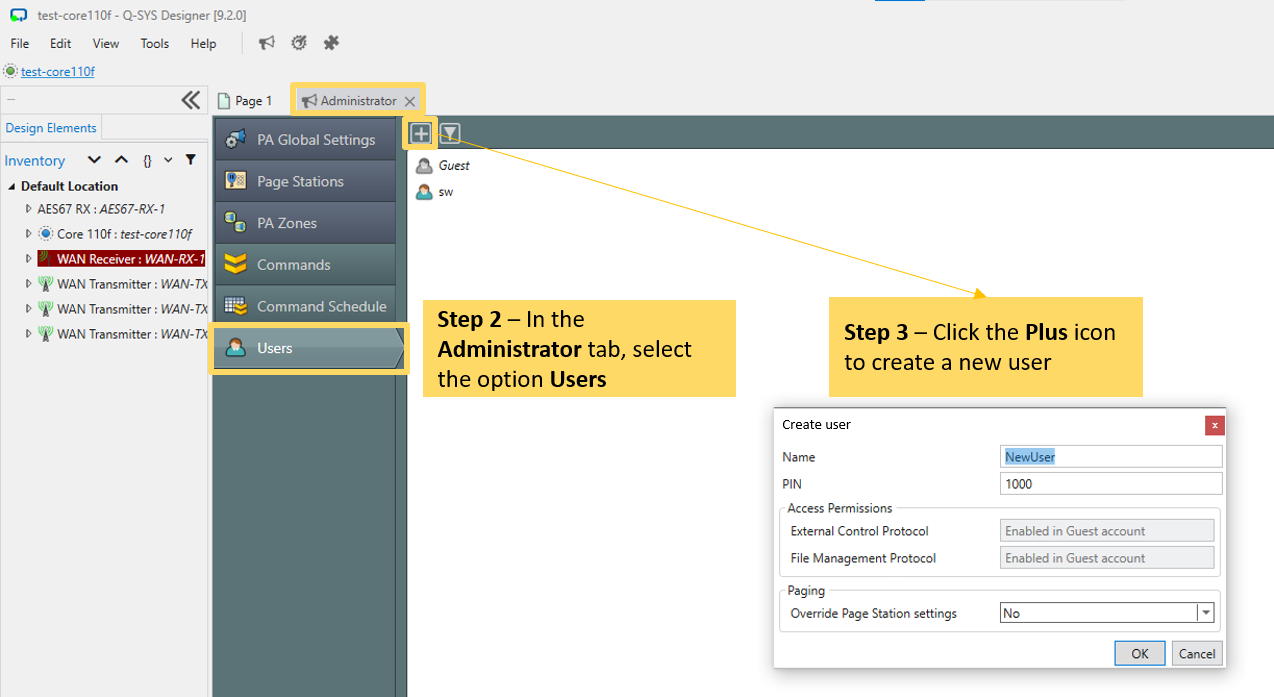 |
Note 1: Design should include PA router component.
Note 2: For Paging station configuration and using live call capability, please follow the Paging station User manual.
See the next chapter: Connecting the VPN box
Was this article helpful?