Q-SYS Ecosystem Integration
- 05 Feb 2026
- 2 Minutes to read
- Print
- Download PDF
Q-SYS Ecosystem Integration
- Updated on 05 Feb 2026
- 2 Minutes to read
- Print
- Download PDF
Article summary
Did you find this summary helpful?
Thank you for your feedback!
Description
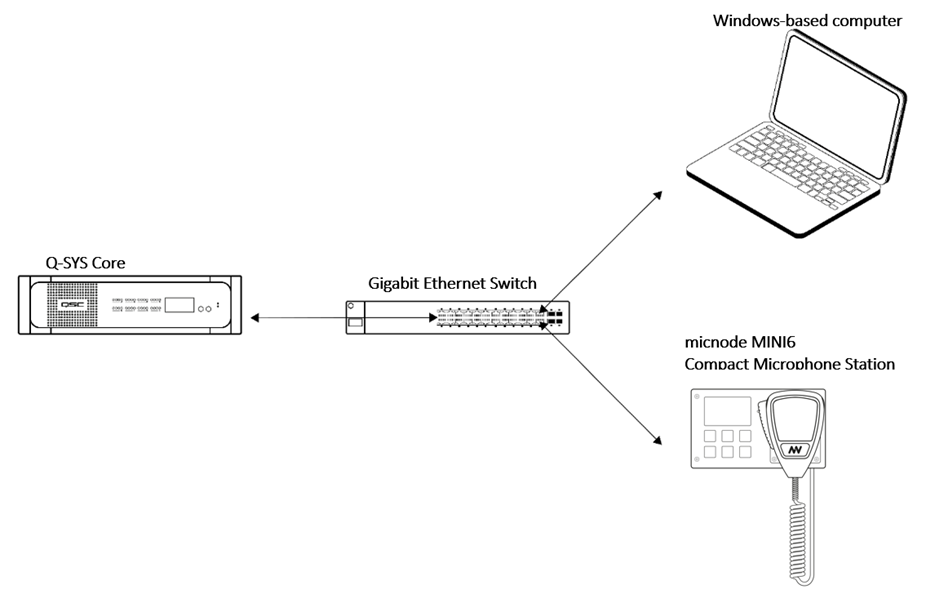
In the previous chapter, you connected your micnode mini6 microphone station to the network via a standard Ethernet cable. To add your new device tothe Q-SYS audio network, the system should consist of:
Q-SYS Core and further Q-SYS peripherals,
Windows-based computer for Q-SYS Designer network setup, not required for runtime operation,
Gigabit Ethernet switch with PoE ports.
Network overview:
 NOTE: Q-SYS Designer version 9.10.1 pictures used in this manual are for illustration purposes only.
To make your mic station operable within the Q-SYS ecosystem, follow the steps which are described in more detail in the chapters below:
Download the Q-SYS plugin for micnode mini,
Configure the plugin in Q-SYS Designer,
Set up the stream,
Configuration zone/action buttons.
Q-SYS Plugin - Download & Configuration
To configure the micnode mini6 microphone station, you will need to install the respective plugin for Q-SYS Designer so that you can then set up the device’s properties.
IMPORTANT: Configuration from the Q-SYS Designer is auto populated to the nnounce configuration UI and thus your micnode mini6 device.
1. The nnounce micnode mini plugin for Q-SYS Designer can be obtained from:
Q-SYS library, or
nnounce webpage in the Download center.
2. Place the downloaded plugin file on your computer in the folder: C:\Users\username\Documents\QSC\Q-Sys Designer\Plugins.
3 Open Q-SYS Designer.
4. In the right-hand panel, locate the micnode mini plugin and drag and drop it into your design. 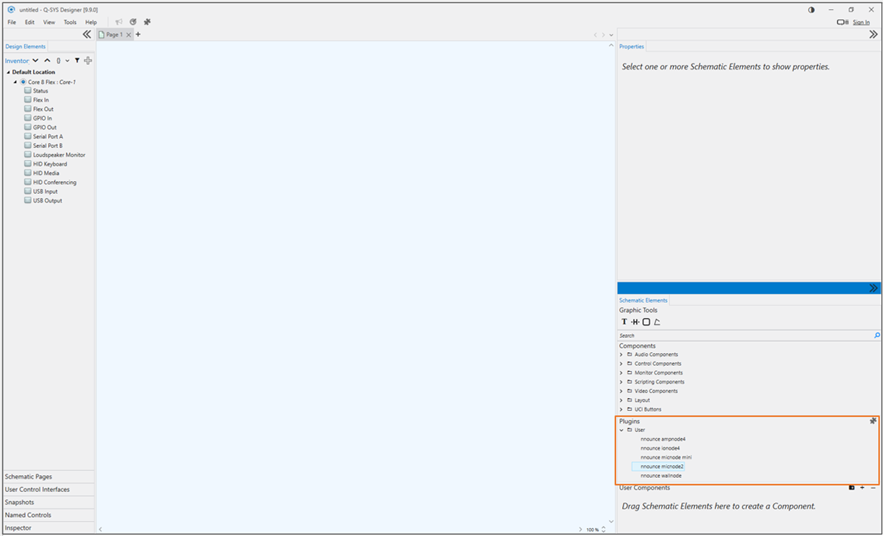
Plugin:

5. Setup the plugin Properties of your micnode mini6 microphone station.
NOTE: Properties open in the right-hand panel by simple click on the micnode mini6 plugin.
Model – select the micnode mini model - mini6 - six button compact microphone station.
Configuration Mode– select stream configuration mode:
Basic – default micnode mini6 design is applied and stream configuration is predefined for you. NOTE: An existing default configuration is not overwritten.
Advanced – manual design and stream configuration. Streams Net Tx channel numbering needs to be correct according to conventions applied. Default design is applied when no other design is created.
Manual - configuration is performed in nnounce configuration UI and is automatically populated to the plugin.
Unit ID – number your device, it is important to assign a unique number, we recommend ascending numbering of your microphone stations.
IMPORTANT: The number is further used for stream configuration.
Zone / action buttons - set the button purpose, as further described in tutorial Microphone Station Buttons Configuration.
Show Debug – set debugmode level
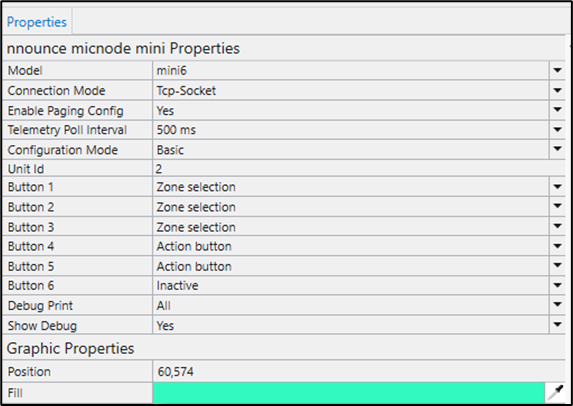
NOTE: Connection Mode will be selected based on Q-SYS version. In older versions TCP socket needs to be manually selected. Web-Socket with encryption is supported since Q-SYS version 9.8.
IMPORTANT:
If no device is connected, use TCP socket mode to prevent Q-SYS Core freeze (versions 9.10.2 and 9.13)
Recommended Q-SYS version for redundant deployment is 9.10.2.
In version 9.13, port 1710 is not functional.
6. Create your design in Q-SYS or add the micnode mini6 to an existing audio configuration. Make sure that the design is disconnected for this step.
7. Select Save to core & Run. Then open the micnode2 plugin detail and set Host/IP of the micnode mini6 device.
NOTE: For a secured Web-Socket connection it is required to use domain name of the device.
IMPORTANT: Use the host as defined in the Connect the Device chapter above – micnode-mini6 followed by the last six digits of the station’s MAC address. Example: micnode-mini6-000000
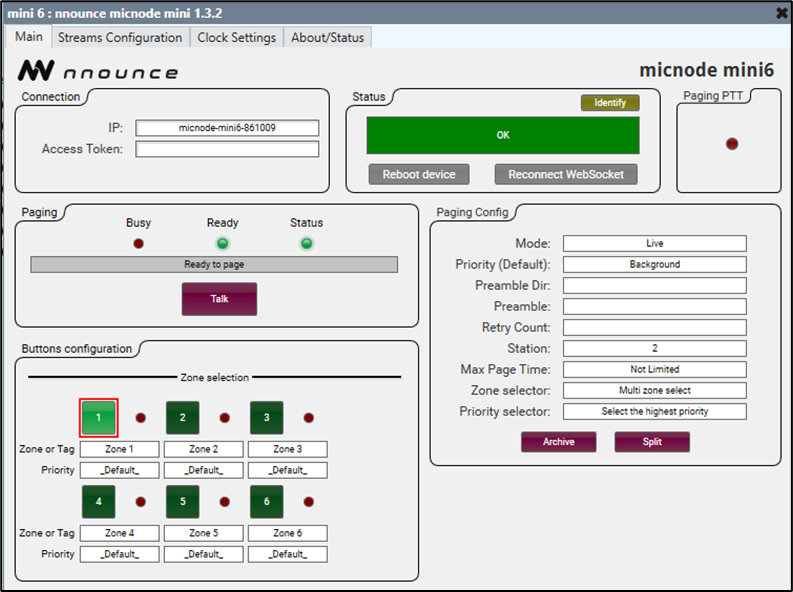
8. Upon successful connection status field shows OK.
Was this article helpful?