Device Location
- 19 Nov 2025
- 1 Minute to read
- Print
- Download PDF
Device Location
- Updated on 19 Nov 2025
- 1 Minute to read
- Print
- Download PDF
Article summary
Did you find this summary helpful?
Thank you for your feedback!
Description
The microphone station can be wall-mounted or placed on horizontal surface by using an desktop stand.
Wall-mount the device
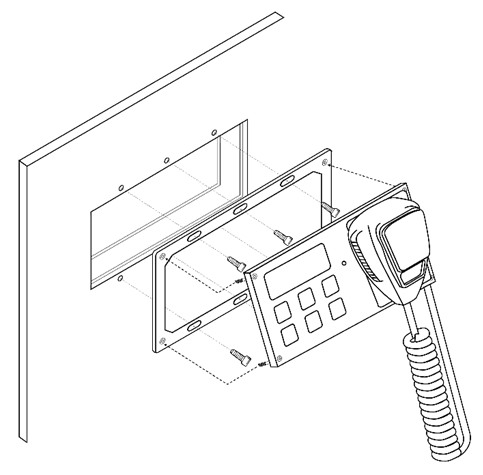
To wall-mount the micnode mini6 device, first prepare the desired location on the wall and ensure the necessary cabling is in place.
Important
The cutout on the wall should not be larger than 120 x 72 mm.
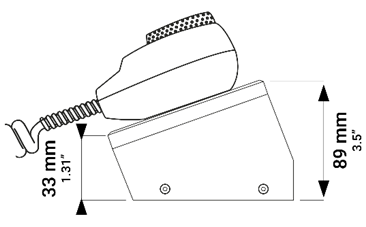
Rear panel with connected microphone cable and sizes:
.png)
The screws for mounting the microphone station are not included in the package. Use screws that are appropriate for the surface that the device will be mounted to.
1. Prepare the cutout and cables for the device.
2. Remove the four long screws holding the mounting bracket - the screws are in the corners of the front panel.
3. Use six screws to attach the mounting bracket to the wall, then route the LAN cable through the opening in the mounting bracket.
Attach the device to the mounting bracket using the four long screws on the front panel corners.
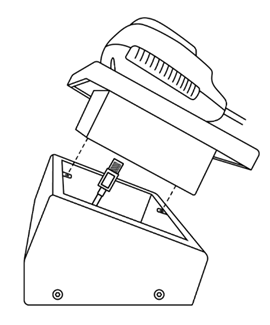
Desk-stand
The micnode mini6 microphone station base attaches to the device with two screws. Before attaching the device to the stand, connect all paging station cables on the rear panel, and put the cables through the stand.
|
|
|---|
Was this article helpful?