Prayer call schedules
  • 24 Sep 2024
  • 2 Minutes to read
  • Dark
    Light
  • PDF

Prayer call schedules

  • Dark
    Light
  • PDF

Article summary

Automate your religious announcements to be played at specific times according to time zone and location. 

Configure prayer calls with a few simple clicks:

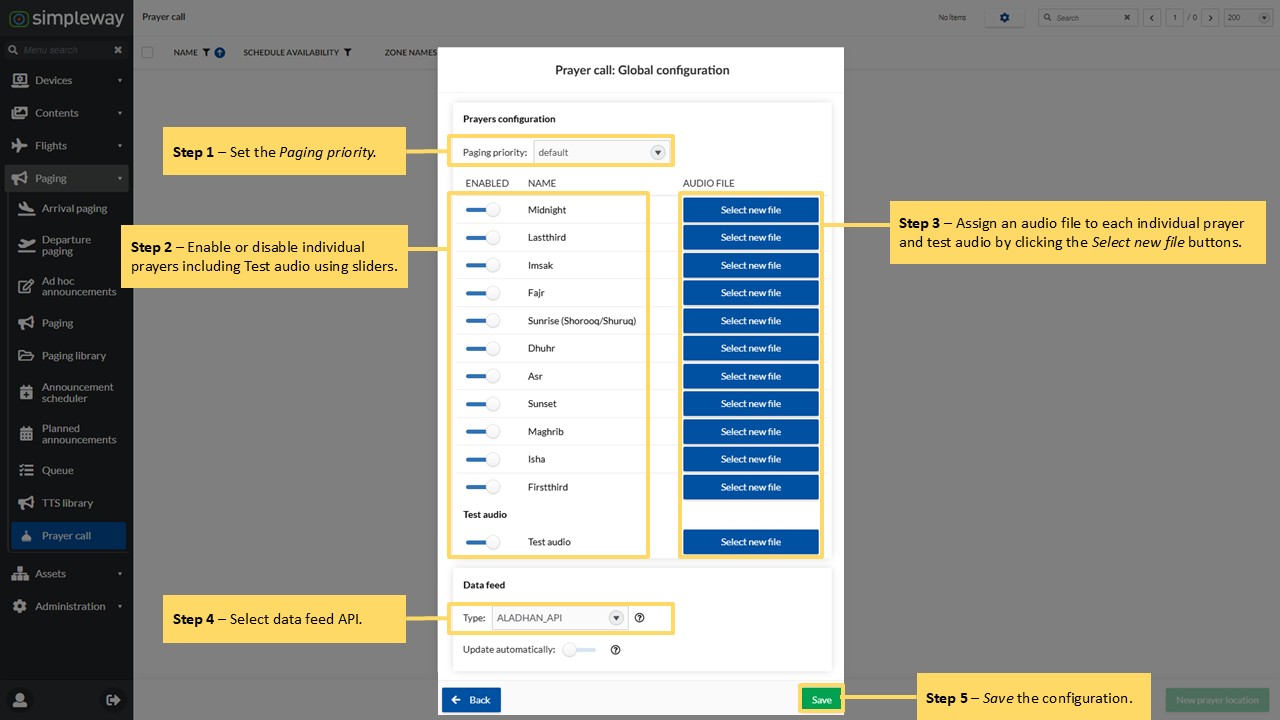
  1. Upload the audio files for your prayers.
  2. Define longitude and latitude for your location/s.
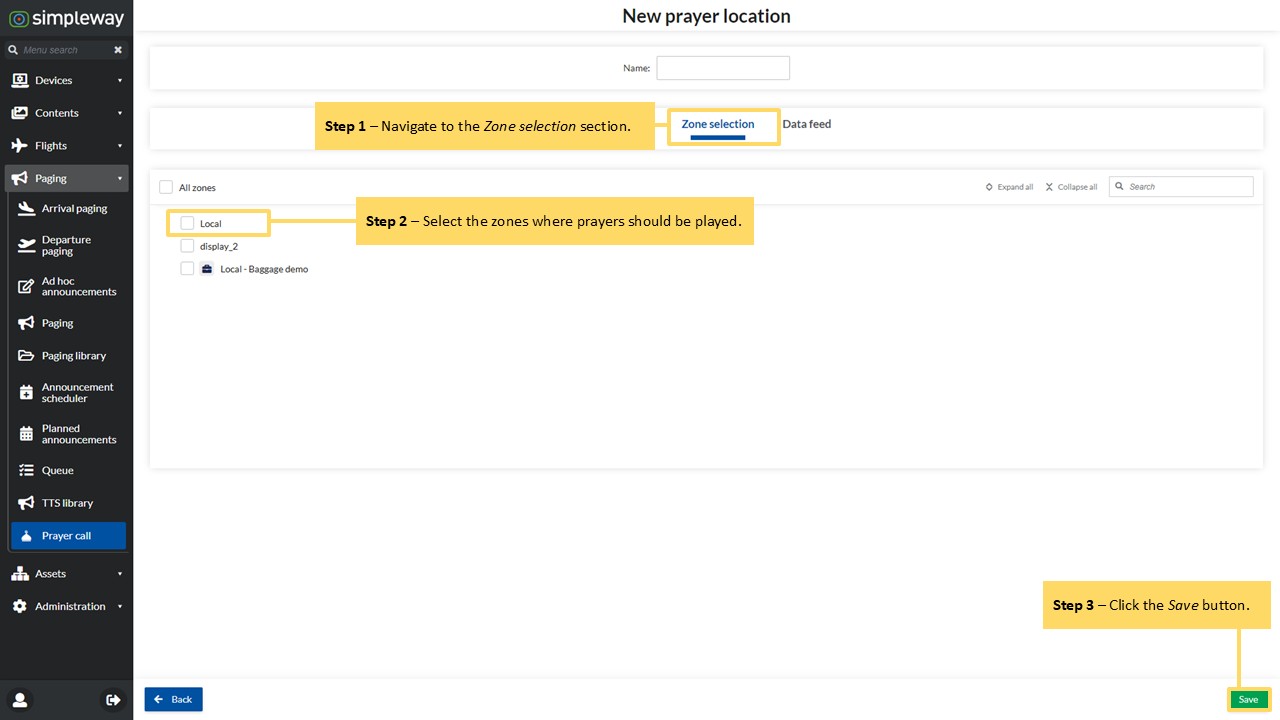
  3. Select the the audio zones for your locations where the prayers shall be played according to time zone.

Prayer call schedules are ready!

Once your religious announcements are configured, you can easily track all schedules for announcement playback in the Prayer call tab and Planned announcement tab, where they can also be modified or disabled.

Topics covered
  • Prayer call tab
  • Planned announcements tab
  • Queue tab (Announcement history)

TUTORIAL STEPS:

A) Prayer call tab

  1. Open the Prayer call  tab.
  2. Click the cog button.


B) Audio files of prayers

The window for global configuration of prayer calls opens:
  1. Set the Paging priority
  2. Enable or disable individual prayers including the Test audio using sliders. 
  3. Assign an audio file to each individual prayer and Test audio by clicking the Select new file buttons. A new Media library will open where audio files can be uploaded and assigned to each prayer.
  4. Save the configuration.

Note 1: The selected Paging priority is applied to all scheduled and testing prayer calls.
Note 2: Global configuration cannot be saved if any of the individual prayers are enabled but don't have an audio file assigned.
Note 3: The selected Data feed (External API) allows for automated updates from an external prayer schedule service.
C) Click the New prayer location button.
D) New prayer location

  1. Fill in the Name of your new prayer location.
  2. Navigate to the Data feed section.


E) Data feed configuration

  1. Enable the data feed by ticking the checkbox.
  2. Fill in the required fields following the instructions provided by the linked API service. 
Note: Most importantly, enter the latitude and longitude of your prayer location.


F) Zone selection

  1. Navigate to the Zone selection section.
  2. Select the zones where prayers should be played.
  3. Click the Save button. A new prayer location is created on the Prayer call tab.


Edit prayer location schedule

A) Reopen the earlier created prayer location by clicking on the item or using the edit option from the three-dot menu.


B) Schedule view
The Edit page opens, displaying the Schedule view section. 


The schedule becomes available when data is provided by the API, which automatically updates every 24 hours. Hence, you may not immediately have an available schedule in your newly created prayer location.  

You can scroll through the schedule content and set the number of displayed rows using the arrows and the dropdown box.

 
C) You can preview each prayer by clicking on the sound icon next to its column heading. You can also test the audio being played in the selected zones by clicking the Test audio button and then clicking the Play button. 

Note: You must have at least one zone selected to perform these actions.
D) Manual data feed update

You can use the Run once button for a manual update. This button becomes available in the Data feed section after saving the new location with the completed data feed fields and reopening the newly created location.


  1. Navigate to the Data feed section.
  2. Click the Run once button.
  3. Save changes.


Was this article helpful?